1. 概述
在软件开发中识别 Java 程序的 Bug 是个关键挑战。**SpotBugs 是一款开源静态分析工具,专门用于检测 Java 代码中的缺陷。它直接分析字节码而非源代码,能精准识别潜在问题,包括逻辑错误、性能隐患和不良编码实践**。作为 FindBugs 的继任者,SpotBugs 在检测精度和细节上做了显著增强。本文将演示如何在 Java 项目中配置 SpotBugs,并集成到 IDE 和 Maven 构建流程中。
2. 缺陷模式
SpotBugs 能检测超过 400 种缺陷模式,例如空指针解引用、无限递归循环、Java 库误用和死锁等。在 SpotBugs 中,缺陷模式通过多个维度分类:违规类型、所属类别、缺陷等级和检测置信度。以下是 SpotBugs 的十大缺陷类别:
- 不良实践:检测可能不会立即引发问题但未来会导致隐患的编码方式,如 hashcode/equals 问题、可克隆接口误用、异常丢弃、序列化问题和 finalize 方法滥用
- 正确性:识别可能导致运行时错误的问题代码(如潜在逻辑错误)
- 实验性:指相对新颖、处于实验阶段或未完全验证的缺陷模式
- 国际化:检测与国际化和本地化相关的潜在问题
- 恶意代码漏洞:标记可能被攻击者利用的代码
- 多线程正确性:检查多线程代码中的竞态条件和死锁等问题
- 虚假随机噪声:用于数据挖掘实验的对照,不适用于实际软件缺陷检测
- 性能:识别虽正确但效率低下的代码
- 安全性:高亮代码中的安全漏洞
- 可疑代码:查找虽不一定错误但存在可疑之处的代码,如死存储、switch 语句穿透、未确认的类型转换和已知的空值冗余检查
SpotBugs 的核心特性之一是能按严重程度对缺陷分级。它采用 1-20 的数字等级划分,数值越高表示问题越轻微:
- 最严重(高优先级):等级 1-4
- 严重(中优先级):等级 5-9
- 麻烦(低优先级):等级 10-14
- 需关注(信息级):等级 15-20
3. SpotBugs Maven 插件
SpotBugs 既可作为独立应用使用,也可通过 Maven、Gradle、Eclipse 和 IntelliJ 等多种方式集成。本节重点介绍 Maven 集成方案。
3.1. Maven 配置
在 pom.xml 的 <plugins> 节点添加 spotbugs-maven-plugin:
<plugin>
    <groupId>com.github.spotbugs</groupId>
    <artifactId>spotbugs-maven-plugin</artifactId>
    <version>4.8.5.0</version>
    <dependencies>
        <dependency>
        <groupId>com.github.spotbugs</groupId>
            <artifactId>spotbugs</artifactId>
        <version>4.8.5</version>
        </dependency>
    </dependencies>
</plugin>
3.2. 生成报告
添加插件后,在终端执行:
mvn spotbugs:check
该命令会分析源码并输出需要修复的警告列表。为演示报告生成,我们使用 GitHub 上的示例项目。假设包含以下类:
public class Application {

    public static final String NAME = "Name: ";

    private Application() {
    }

    public static String readName() {
        Scanner scanner = new Scanner(System.in);
        String input = scanner.next();
        return NAME.concat(input);
    }
}
执行 mvn spotbugs:check 后检测到以下问题:
[INFO] BugInstance size is 1
[INFO] Error size is 0
[INFO] Total bugs: 1
[ERROR] High: Found reliance on default encoding in com.baeldung.systemin.Application.readName(): new java.util.Scanner(InputStream) [com.baeldung.systemin.Application] At Application.java:[line 13] DM_DEFAULT_ENCODING
报告显示 Application 类存在一个高优先级缺陷。
3.3. 查看结果
SpotBugs 默认在 target/spotbugsXml.xml 生成 XML 格式报告。要获得更友好的可视化报告,需在插件配置中添加 htmlOutput:
<configuration>
    <htmlOutput>true</htmlOutput>
</configuration>
执行 mvn clean install 和 mvn spotbugs:check 后,通过浏览器打开 target/spotbugs.html 查看报告:
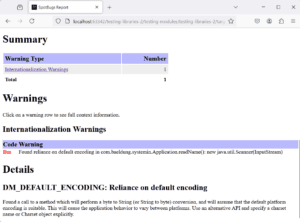
也可通过 mvn spotbugs:gui 命令启动 SpotBugs GUI 查看详情:
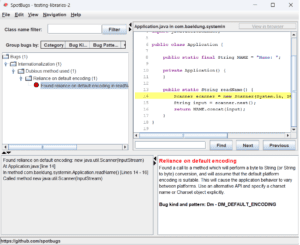
根据反馈,我们能主动修复代码中的缺陷。
3.4. 修复缺陷
Application 类存在 DM_DEFAULT_ENCODING 缺陷,表明在 I/O 操作中依赖了默认字符编码。⚠️ 这在不同环境/平台可能导致行为异常。通过显式指定编码可确保跨平台一致性。修复方法是为 Scanner 添加编码参数:
public static String readName() {
    Scanner scanner = new Scanner(System.in, StandardCharsets.UTF_8.displayName());
    String input = scanner.next();
    return NAME.concat(input);
}
修复后再次运行 mvn spotbugs:check,显示无缺陷:
[INFO] BugInstance size is 0
[INFO] Error size is 0
[INFO] No errors/warnings found
4. SpotBugs IntelliJ IDEA 插件
IntelliJ SpotBugs 插件提供字节码静态分析能力,可直接在 IDEA 内检测 Java 代码缺陷。该插件底层仍使用 SpotBugs 引擎。
4.1. 安装
在 IntelliJ IDEA 中安装 SpotBugs 插件:
- 打开应用进入欢迎界面(或通过
File -> Settings/ macOSIntelliJ IDEA -> Preferences) - 选择
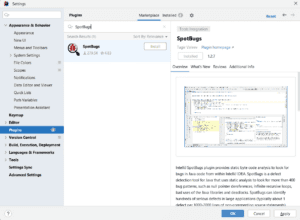
Plugins->Marketplace - 搜索
SpotBugs并点击Install - 重启 IDEA 激活插件
手动安装步骤:
- 从 JetBrains 插件仓库 下载插件
- 进入
File -> Settings -> Plugins - 点击右上角齿轮图标选择
Install Plugin from Disk - 选择下载的 zip 文件并重启 IDEA
4.2. 浏览报告
在 IDEA 中启动分析:
- 打开 SpotBugs-IDEA 面板
- 点击
Analyze Current File - 查看分析结果:
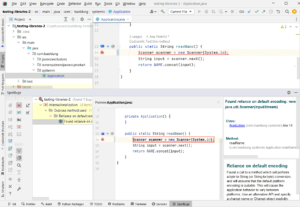
✅ 可通过左侧命令栏按类别/类/包/优先级等维度分组缺陷
❌ 支持通过 export 按钮导出 XML/HTML 格式报告
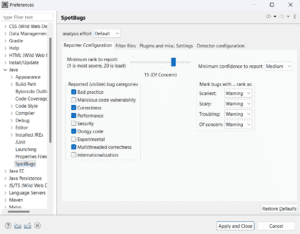
4.3. 配置
SpotBugs IDEA 插件提供丰富的自定义选项,典型配置界面如下:
核心配置项包括:
- 缺陷类别与优先级:控制要检测的缺陷类型和最小缺陷等级
- 过滤文件:通过模式匹配排除/包含特定包、类或方法
- 注解:配置类/方法/字段的注解,用于抑制特定警告
- 检测器:启用/禁用特定检测器(如专注安全问题时可仅启用安全相关检测器)
这些配置让开发者能灵活控制分析范围和报告方式,有效提升代码质量。
5. SpotBugs Eclipse 插件
本节介绍 SpotBugs Eclipse 插件的安装与使用。
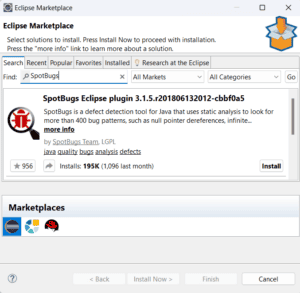
5.1. 安装
Eclipse 插件安装方式一(Marketplace):
- 启动 Eclipse 进入
Help->Eclipse Marketplace - 搜索
SpotBugs并点击Install - 按向导完成安装后重启 Eclipse
方式二(更新站点):
- 进入
Help->Install New Software - 点击
Add添加仓库:名称SpotBugs,地址https://spotbugs.github.io/eclipse - 选中
SpotBugs并按向导安装后重启
5.2. 浏览报告
使用 Eclipse 插件启动静态分析:
- 在
Project Explorer右键项目 - 选择
SpotBugs -> Find Bugs - 在
Bug Explorer窗口查看结果
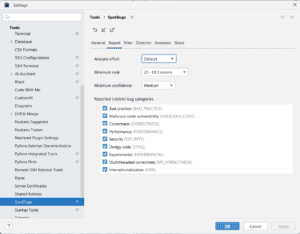
5.3. 配置
通过 Window -> Preferences -> Java -> SpotBugs 访问配置界面:
关键配置功能:
- 基础设置:取消不关注的类别、调整最小报告等级/置信度、自定义缺陷标记
- 检测器配置:精细控制各检测器的启用状态
- 文件过滤:创建自定义规则排除/包含特定文件或目录
这些配置使开发者能针对项目需求定制分析策略,避免无关干扰。
6. 总结
本文介绍了在 Java 项目中使用 SpotBugs 的核心要点。作为字节码分析工具,SpotBugs 能有效识别代码中的潜在缺陷。我们学习了如何通过 Maven 自动化构建过程集成缺陷检测,并演示了在 IntelliJ IDEA 和 Eclipse 等 IDE 中的集成方案。这些实践能帮助开发者在日常工作中主动发现并修复问题,持续提升代码质量。完整示例代码可在 GitHub 获取。