1. 概述
本教程将逐步拆解如何使用Splunk的HTTP事件收集器(HEC),将Spring Boot应用的实时日志直接流式传输到Splunk。首先,我们通过一个简单的XML文件在Spring Boot端完成所有配置,建立日志与Splunk的连接。这里选择log4j2作为日志框架,因为它流行且与Splunk无缝集成。
2. Splunk是什么?
Splunk是监控、搜索和可视化机器生成数据的神器。它不仅能高效索引和连接实时数据,还能创建炫酷的可视化仪表盘实现无缝监控。此外,Splunk提供友好的搜索命令,甚至包含专用的搜索处理语言(SPL)用于高级查询。
3. 设置Splunk
访问Splunk企业版下载安装。路径:我的仪表盘(右上角)-> Splunk企业版(向下滚动)-> 下载(选择对应操作系统)。
⚠️ 安装时务必记录用户名和密码
3.1. 配置Splunk接收日志
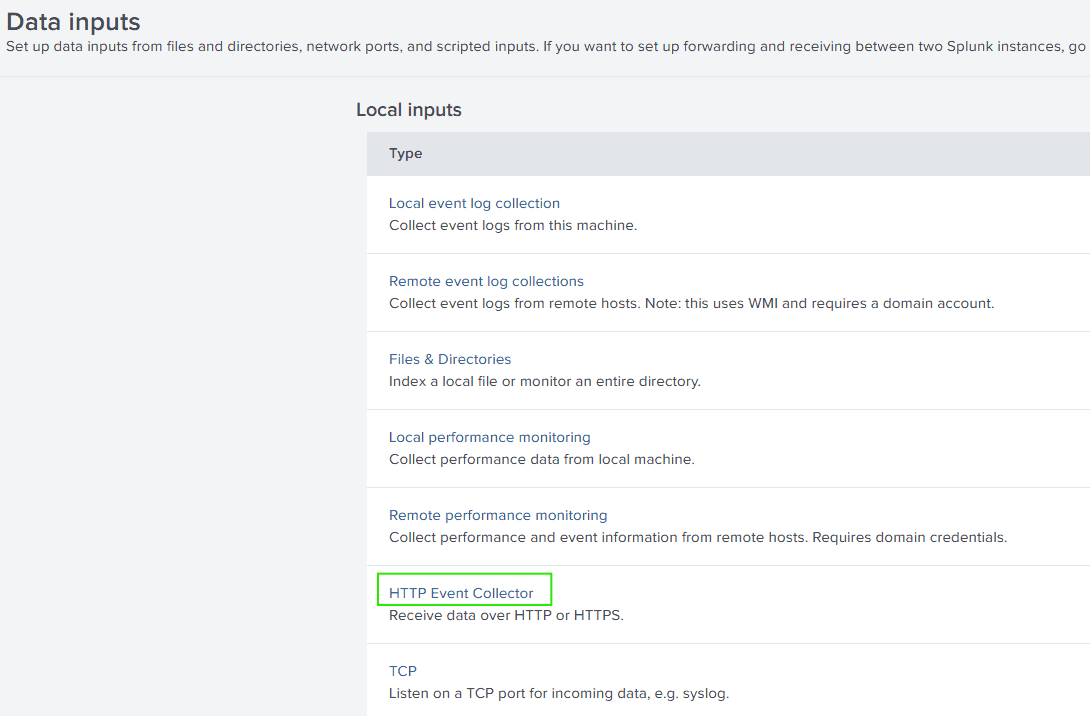
在Splunk中创建索引(index),以便在Spring Boot中使用这些凭证定向日志。操作路径:设置(右上角)-> 数据输入 -> HTTP事件收集器,如下图所示:
创建唯一token安全发送数据到Splunk。该token不仅用于认证数据源,还能跟踪和控制数据访问。点击"New token"(右上角)并填写以下信息:
- Name:token组中的唯一标识符
- Source Name Override:按数据源分类数据,Splunk用它确定索引和搜索方式
接下来点击"Select"并在下拉菜单选择"Log4j"(因为Spring Boot端将使用它)。
必须创建索引优化数据排序和查询。该索引将优先于默认的源名称设置。点击"Create a new index"并输入有意义的索引名称,其他字段保持默认后点击"Save"。
✅ 检查后点击"Submit",记录新创建行中的token值
3.2. 配置全局设置
操作路径:设置(右上角)-> 数据输入 -> HTTP事件收集器,点击全局设置按钮(右上角)。按以下属性更新:
所有Tokens: 启用
默认源类型: JSON
默认索引: student_api_dev
⚠️ 记录HTTP端口号,其他保持默认后点击"Save"
基于"默认索引",未指定索引时Splunk会自动将事件分配到student_api_dev索引。"所有Tokens启用"使Splunk能接收所有已创建token的日志。
4. 从Spring Boot发送日志到Splunk
4.1. Maven依赖
更新仓库信息:
<repository>
    <id>splunk-artifactory</id>
    <name>Splunk Releases</name>
    <url>https://splunk.jfrog.io/splunk/ext-releases-local</url>
</repository>
由于Spring Web Starter默认包含*spring-boot-starter-logging,需要显式排除它以引入log4j*:
<exclusion>
    <groupId>org.springframework.boot</groupId>
    <artifactId>spring-boot-starter-logging</artifactId>
</exclusion>
同样需要从spring-boot-starter-test中排除。
添加Splunk-library-javalogging处理所有Splunk相关配置:
<dependency>
    <groupId>com.splunk.logging</groupId>
    <artifactId>splunk-library-javalogging</artifactId>
    <version>${splunk-logging.version}</version>
</dependency>
日志生成使用log4j2:
<dependency>
    <groupId>org.springframework.boot</groupId>
    <artifactId>spring-boot-starter-log4j2</artifactId>
</dependency>
4.2. 添加控制器类
创建RestController.java,实现三种API接口:
- 添加学生
- 获取所有学生
- 按学号获取学生
@PostMapping
public Student addStudent(@RequestBody Student student) {
    return studentService.addStudent(student);
}

@GetMapping
public List<Student> getStudents() {
    return studentService.getStudents();
}

@GetMapping("{rollNumber}")
public Student getStudent(@PathVariable("rollNumber") int rollNumber) {
    return studentService.getStudent(rollNumber);
}
4.3. 添加模型和服务类
创建Student.java POJO类:
public class Student {
    private String name;
    private int rollNumber;

    public Student() {
    }

    // 标准getter/setter/toString/equals/hashCode方法
}
StudentService.java处理学生相关操作。包含的日志记录器会在控制台打印日志,同时以相同格式发送到Splunk:
@Service
public class StudentService {
    private static final Logger logger = LogManager.getLogger(StudentService.class);
    private final List<Student> students = new ArrayList<>();
}
包含三个方法对应控制器中的API:
public Student addStudent(Student student) {
    logger.info("addStudent: adding Student");
    logger.info("addStudent: Request: {}", student);
    students.add(student);
    logger.info("addStudent: added Student");
    logger.info("addStudent: Response: {}", student);
    return student;
}

public List<Student> getStudents() {
    logger.info("getStudents: getting Students");
    List<Student> studentsList = students;
    logger.info("getStudents: got Students");
    logger.info("getStudents: Response: {}", studentsList);
    return studentsList;
}

public Student getStudent(int rollNumber) {
    logger.info("getStudent: getting Student");
    logger.info("getStudent: Request: {}", rollNumber);
    Student student = students.stream().filter(stu -> stu.getRollNumber() == rollNumber)
      .findAny().orElseThrow(() -> new RuntimeException("Student not found"));
    logger.info("getStudent: got Student");
    logger.info("getStudent: Response: {}", student);
    return student;
}
4.4. 添加Splunk日志配置文件
文件必须遵循特定命名约定以便Spring Boot自动识别:
[logging-framework]-spring.xml
将方括号替换为当前使用的日志框架名称,例如:
log4j2-spring.xml
将该文件放在Spring Boot项目的resources文件夹,Spring Boot会自动检测加载:
<?xml version="1.0" encoding="UTF-8"?>
<Configuration>
    <Appenders>
        <Console name="console" target="SYSTEM_OUT">
            <PatternLayout
              pattern="%style{%d{ISO8601}} %highlight{%-5level }[%style{%t}{bright,blue}]
              %style{%C{10}}{bright,yellow}: %msg%n%throwable"/>
        </Console>
        <SplunkHttp
          name="splunkhttp"
          url="http://localhost:8088"
          token="11806291-7e0e-422a-a083-abfdd4b2eb74"
          host="localhost"
          index="student_api_dev"
          type="raw"
          source="student-http-events"
          sourcetype="log4j"
          messageFormat="text"
          disableCertificateValidation="true">
            <PatternLayout pattern="%m"/>
        </SplunkHttp>
    </Appenders>

    <Loggers>
        <Root level="info">
            <AppenderRef ref="console"/>
            <AppenderRef ref="splunkhttp"/>
        </Root>
    </Loggers>
</Configuration>
关键配置说明:
- Appenders:指定日志发送目标
- Console:常用控制台输出
- PatternLayout:定义日志格式(时间戳、级别、消息等)
- SplunkHttp:提供Splunk服务器地址、token等连接详情
- Loggers:作为过滤器决定记录内容
4.5. 在Splunk中填充日志
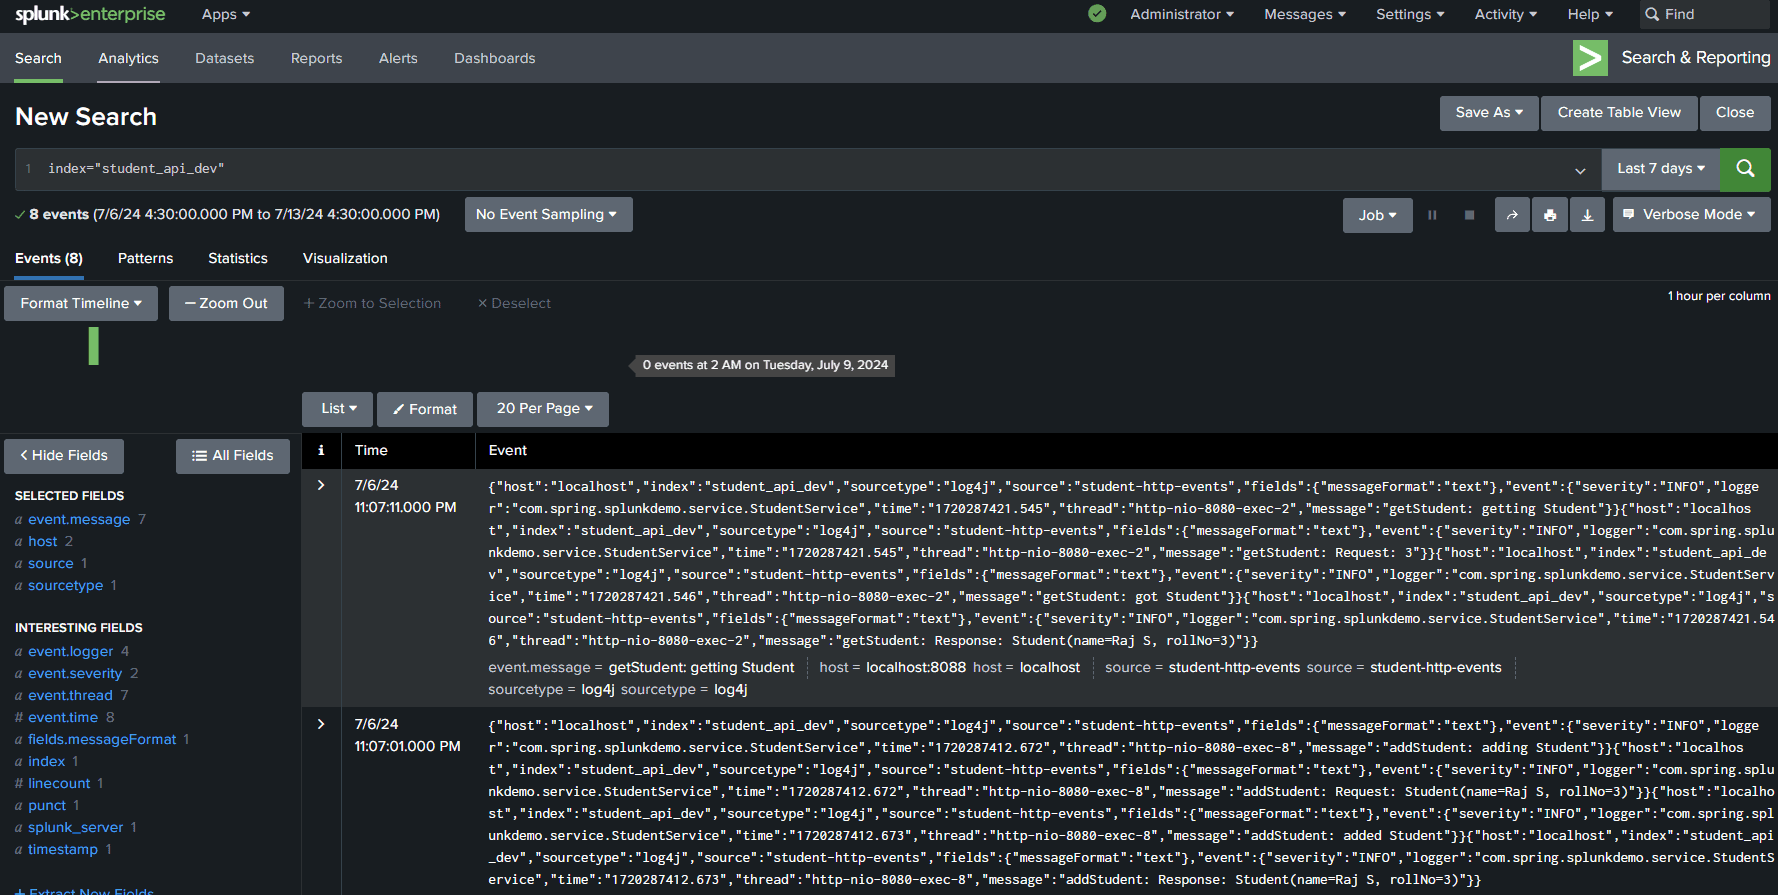
启动应用并运行后,向API发送请求。然后在Splunk中执行查询:
index="student_api_dev"
将看到类似下图的日志结果:
5. 结论
Splunk是实时数据监控、搜索和可视化的强大工具,特别适合跟踪机器生成数据。其优势包括:
- ✅ 可扩展性:高效处理增长的数据量
- ✅ SPL语言:支持复杂查询的灵活性
- ✅ 实时更新:结合RBAC和高级索引系统实现快速安全分析
与Spring Boot集成后,Splunk简化了日志摄取、分析和可视化过程,为生产环境提供主动问题解决的有价值洞察和告警。
本文源代码可在GitHub获取。

