1. 概述
Vaadin Flow 是一个基于服务端的 Java Web 界面开发框架,所有 UI 逻辑运行在服务端,通过 WebSocket 或长轮询与浏览器通信。这意味着你完全可以用 Java 写前端,不用碰 HTML、JS —— 对 Java 后端开发者非常友好。
本文将带你用 Vaadin Flow 搭配 Spring Boot,实现一个完整的 CRUD 管理界面。后端用 Spring Data JPA 做持久化,前端用 Vaadin 构建响应式 UI。
如果你还不了解 Vaadin Flow,建议先看下 Baeldung 的 Vaadin 入门教程。
2. 环境搭建
在标准的 Spring Boot 项目中添加 Vaadin 的 starter 依赖即可:
<dependency>
    <groupId>com.vaadin</groupId>
    <artifactId>vaadin-spring-boot-starter</artifactId>
</dependency>
✅ 小贴士:Vaadin 已被 Spring Initializr 官方支持,创建项目时可以直接勾选 Vaadin 模块,省去手动加依赖的麻烦。
如果你不用 Initializr,也可以手动引入 Vaadin 的 BOM(Bill of Materials)来统一版本管理:
<dependencyManagement>
    <dependencies>
        <dependency>
            <groupId>com.vaadin</groupId>
            <artifactId>vaadin-bom</artifactId>
            <version>24.3.8</version> <!-- 建议查最新版本 -->
            <type>pom</type>
            <scope>import</scope>
        </dependency>
    </dependencies>
</dependencyManagement>
⚠️ 注意:Vaadin 版本更新较快,建议使用 LTS 或最新稳定版,避免踩坑。
3. 后端服务
我们以 Employee 实体为例,实现增删改查功能。字段包含 firstName 和 lastName,并加上基础校验:
@Entity
public class Employee {
    @Id
    @GeneratedValue
    private Long id;

    @Size(min = 2, message = "姓名至少 2 个字符")
    private String firstName;

    @Size(min = 2, message = "姓氏至少 2 个字符")
    private String lastName;

    public Employee() {
    }

    // Getters and setters
}
接着定义 Spring Data JPA 的 Repository 接口:
public interface EmployeeRepository extends JpaRepository<Employee, Long> {
    List<Employee> findByLastNameStartsWithIgnoreCase(String lastName);
}
这里我们自定义了一个查询方法 findByLastNameStartsWithIgnoreCase,用于支持按姓氏模糊搜索。
为了演示方便,启动时预置几条测试数据:
@Bean
public CommandLineRunner loadData(EmployeeRepository repository) {
    return (args) -> {
        repository.save(new Employee("Bill", "Gates"));
        repository.save(new Employee("Mark", "Zuckerberg"));
        repository.save(new Employee("Sundar", "Pichai"));
        repository.save(new Employee("Jeff", "Bezos"));
    };
}
4. Vaadin Flow 前端界面
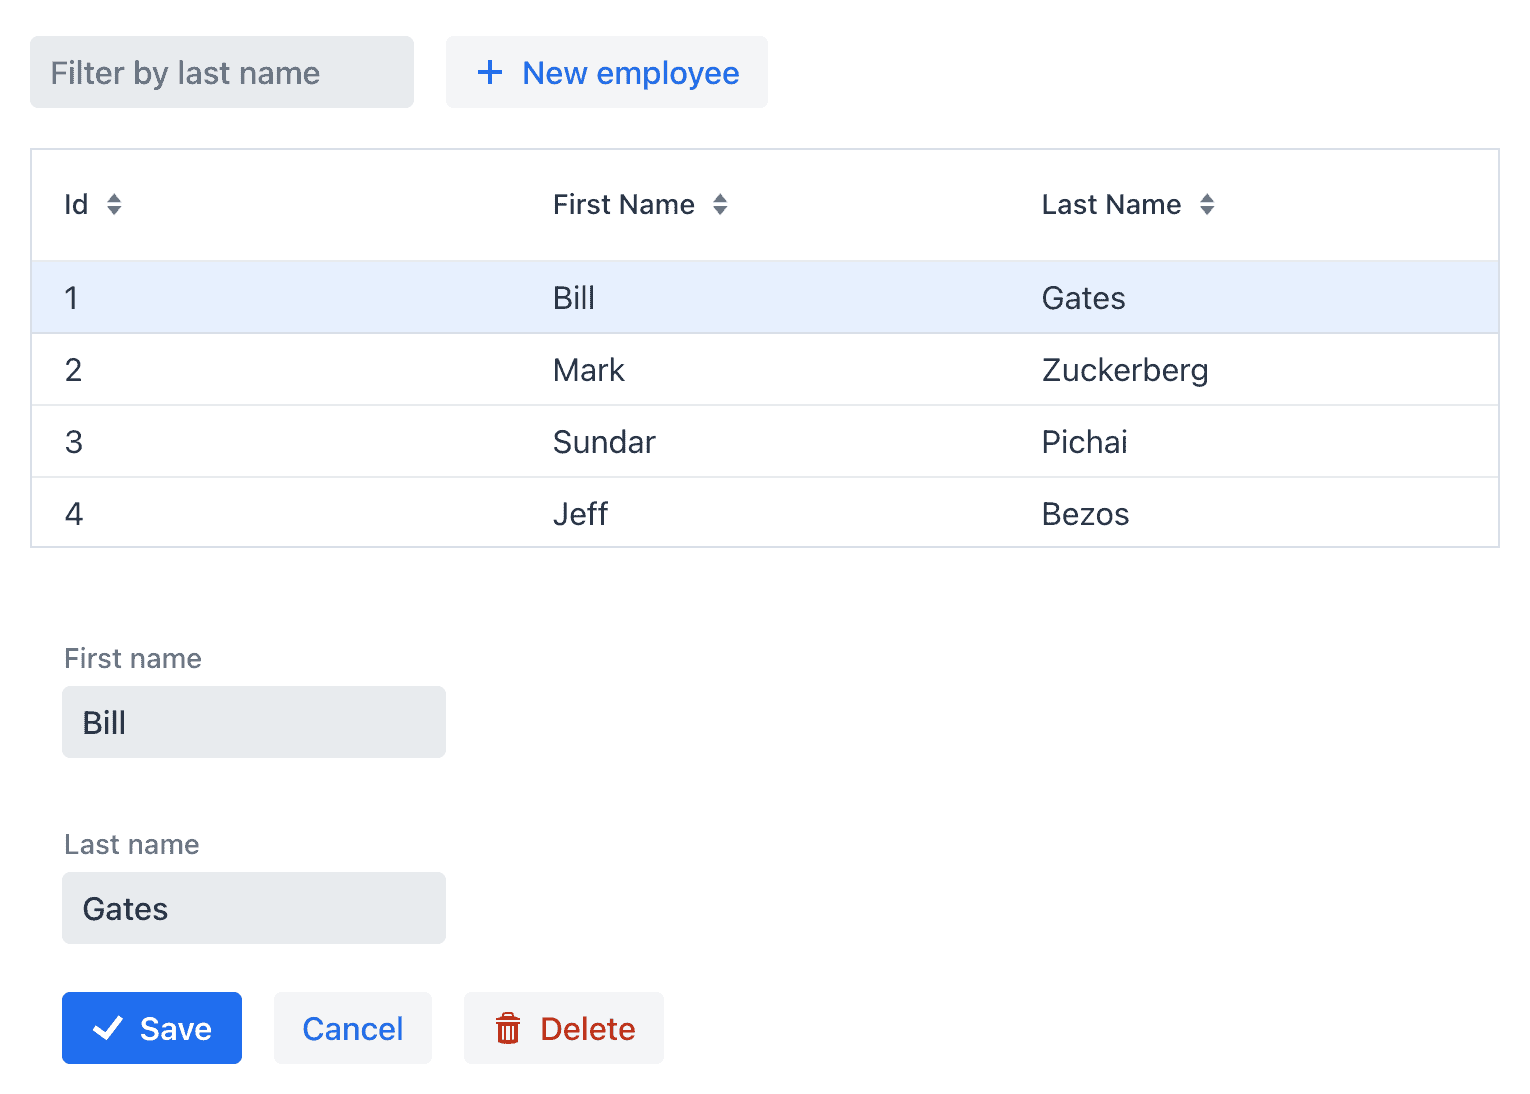
我们要构建一个带搜索框的员工列表,点击某行可编辑,下方弹出表单。整体结构如下:
4.1. 自定义表单组件:EmployeeEditor
我们封装一个 EmployeeEditor 组件,用于编辑或新增员工。它由多个 Vaadin 内置组件组合而成。
继承 Composite<VerticalLayout> 而不是直接用 VerticalLayout,可以更好地封装内部实现,避免暴露不必要的 API。
先定义组件的事件监听接口:
public class EmployeeEditor extends Composite<VerticalLayout> {
    public interface SaveListener {
        void onSave(Employee employee);
    }

    public interface DeleteListener {
        void onDelete(Employee employee);
    }

    public interface CancelListener {
        void onCancel();
    }

    private Employee employee;
    private SaveListener saveListener;
    private DeleteListener deleteListener;
    private CancelListener cancelListener;

    private final Binder<Employee> binder = new BeanValidationBinder<>(Employee.class);

    public void setEmployee(Employee employee) {
        this.employee = employee;
        binder.readBean(employee);
    }

    // Getters and setters
}
Binder 是 Vaadin 的数据绑定核心,结合 @Size 等注解,自动完成表单校验和数据绑定。
构造 UI 部分代码如下:
public EmployeeEditor() {
    var firstName = new TextField("First name");
    var lastName = new TextField("Last name");

    var save = new Button("Save", VaadinIcon.CHECK.create());
    var cancel = new Button("Cancel");
    var delete = new Button("Delete", VaadinIcon.TRASH.create());

    binder.forField(firstName).bind("firstName");
    binder.forField(lastName).bind("lastName");

    save.addThemeVariants(ButtonVariant.LUMO_PRIMARY);
    save.addClickListener(e -> save());
    save.addClickShortcut(Key.ENTER); // 回车保存

    delete.addThemeVariants(ButtonVariant.LUMO_ERROR);
    delete.addClickListener(e -> deleteListener.onDelete(employee));

    cancel.addClickListener(e -> cancelListener.onCancel());

    getContent().add(firstName, lastName, new HorizontalLayout(save, cancel, delete));
}
✅ 注意点:
binder.bind()自动映射字段,支持 JSR-303 校验addClickShortcut(Key.ENTER)实现回车保存,用户体验更佳LUMO_PRIMARY和LUMO_ERROR是 Vaadin 内置主题,提升视觉一致性
4.2. 主视图:EmployeesView
EmployeesView 是应用的入口,通过 @Route("") 注解绑定到根路径 /。
它是一个 Spring Bean,可以直接通过构造函数注入 EmployeeRepository:
@Route("")
public class EmployeesView extends VerticalLayout {
    private final EmployeeRepository employeeRepository;

    private final TextField filter;
    private final Grid<Employee> grid;
    private final EmployeeEditor editor;

    public EmployeesView(EmployeeRepository repo) {
        employeeRepository = repo;

        var addButton = new Button("New employee", VaadinIcon.PLUS.create());
        filter = new TextField();
        grid = new Grid<>(Employee.class);
        editor = new EmployeeEditor();

        var actionsLayout = new HorizontalLayout(filter, addButton);
        add(actionsLayout, grid, editor);
    }
}
4.3. 组件配置与数据绑定
我们封装两个辅助方法,处理数据刷新和选中事件:
private void updateEmployees(String filterText) {
    if (filterText.isEmpty()) {
        grid.setItems(employeeRepository.findAll());
    } else {
        grid.setItems(employeeRepository.findByLastNameStartsWithIgnoreCase(filterText));
    }
}

private void editEmployee(Employee employee) {
    editor.setEmployee(employee);

    if (employee != null) {
        editor.setVisible(true);
    } else {
        grid.asSingleSelect().setValue(null);
        editor.setVisible(false);
    }
}
接下来配置组件行为:
public EmployeesView(EmployeeRepository repo) {
    // ... 组件创建

    configureEditor();

    addButton.addClickListener(e -> editEmployee(new Employee()));

    filter.setPlaceholder("Filter by last name");
    filter.setValueChangeMode(ValueChangeMode.EAGER);
    filter.addValueChangeListener(e -> updateEmployees(e.getValue()));

    grid.setHeight("200px");
    grid.asSingleSelect().addValueChangeListener(e -> editEmployee(e.getValue()));

    updateEmployees("");
}

private void configureEditor() {
    editor.setVisible(false);

    editor.setSaveListener(employee -> {
        var saved = employeeRepository.save(employee);
        updateEmployees(filter.getValue());
        editor.setEmployee(null);
        grid.asSingleSelect().setValue(saved);
    });

    editor.setDeleteListener(employee -> {
        employeeRepository.delete(employee);
        updateEmployees(filter.getValue());
        editEmployee(null);
    });

    editor.setCancelListener(() -> {
        editEmployee(null);
    });
}
⚠️ 踩坑提醒:
setValueChangeMode(EAGER)表示输入时立即触发事件,若用LAZY则会在用户停止输入后延迟触发grid.asSingleSelect()将表格设为单选模式,监听选中变化- 编辑完成后调用
updateEmployees()刷新列表,保证数据一致性
4.4. 运行应用
使用 Maven 启动:
mvn spring-boot:run
访问 http://localhost:8080 即可看到界面:
功能验证:
- ✅ 搜索框支持按姓氏模糊查询
- ✅ 点击列表行,下方表单自动填充
- ✅ 支持新增、保存、删除
- ✅ 表单字段校验生效(少于 2 字符会提示)
5. 总结
本文通过一个简单但完整的示例,展示了如何用 Spring Boot + Vaadin Flow 快速构建企业级 CRUD 界面。
✅ 核心优势:
- 全 Java 开发,适合后端主导的团队
- 与 Spring 生态无缝集成
- 组件化开发,UI 复用性强
- 内置数据绑定与校验,开发效率高
❌ 注意事项:
- Vaadin 服务端渲染会占用较多内存,高并发场景需评估
- 定制 UI 主题需要学习 Lumo CSS 变量
- 移动端适配需额外处理
代码已上传至 GitHub:https://github.com/baeldung/tutorials/tree/master/vaadin
适合想快速出 Demo 或内部管理系统的团队参考,简单粗暴,见效快。
