1. 概述
本文将演示如何在 Spring Boot 应用中集成 Apache Camel 和 LangChain4j,通过本地部署的 Ollama 处理 AI 对话,实现 WhatsApp 消息的智能响应。Apache Camel 负责系统间的数据路由与转换,LangChain4j 则提供与大语言模型交互的工具链。
ℹ️ 关于 Ollama 的安装与硬件要求,可参考我们之前的教程 在 Linux 上安装 Ollama 生成式 AI。Ollama 同时支持 Windows 和 macOS。
我们将使用 Postman 测试 Ollama API、WhatsApp API 以及 Spring Boot 控制器。
2. Spring Boot 初始配置
首先确保本地端口 8080 未被占用(Spring Boot 默认端口)。由于需要使用 @RequestParam 注解绑定请求参数,必须添加 -parameters 编译参数:
<plugin>
    <groupId>org.apache.maven.plugins</groupId>
    <artifactId>maven-compiler-plugin</artifactId>
    <configuration>
        <source>17</source>
        <target>17</target>
        <compilerArgs>
            <arg>-parameters</arg>
        </compilerArgs>
    </configuration>
</plugin>
⚠️ 若遗漏此配置,反射将无法获取参数名,导致 REST 调用抛出 java.lang.IllegalArgumentException。
为方便调试,开启 DEBUG 级别的消息日志(application.properties):
# 日志配置
logging.level.root=INFO
logging.level.com.baeldung.chatbot=DEBUG
🔍 排错技巧:可使用 Linux/macOS 的
tcpdump或 Windows 的windump分析 Ollama 与 Spring Boot 间的本地流量。但 WhatsApp Cloud 通信因采用 HTTPS 协议,抓包会复杂得多。
3. LangChain4j 集成 Ollama
默认 Ollama 监听端口 11434。本文使用 qwen2:1.5b 模型(速度较快),但可自由选择其他模型。
LangChain4j 提供多个 ChatLanguageModel.generate(..) 方法,**底层均调用 Ollama 的 REST 接口 /api/chat**。先用 Ollama 文档中的 JSON 示例 验证 API 可用性:
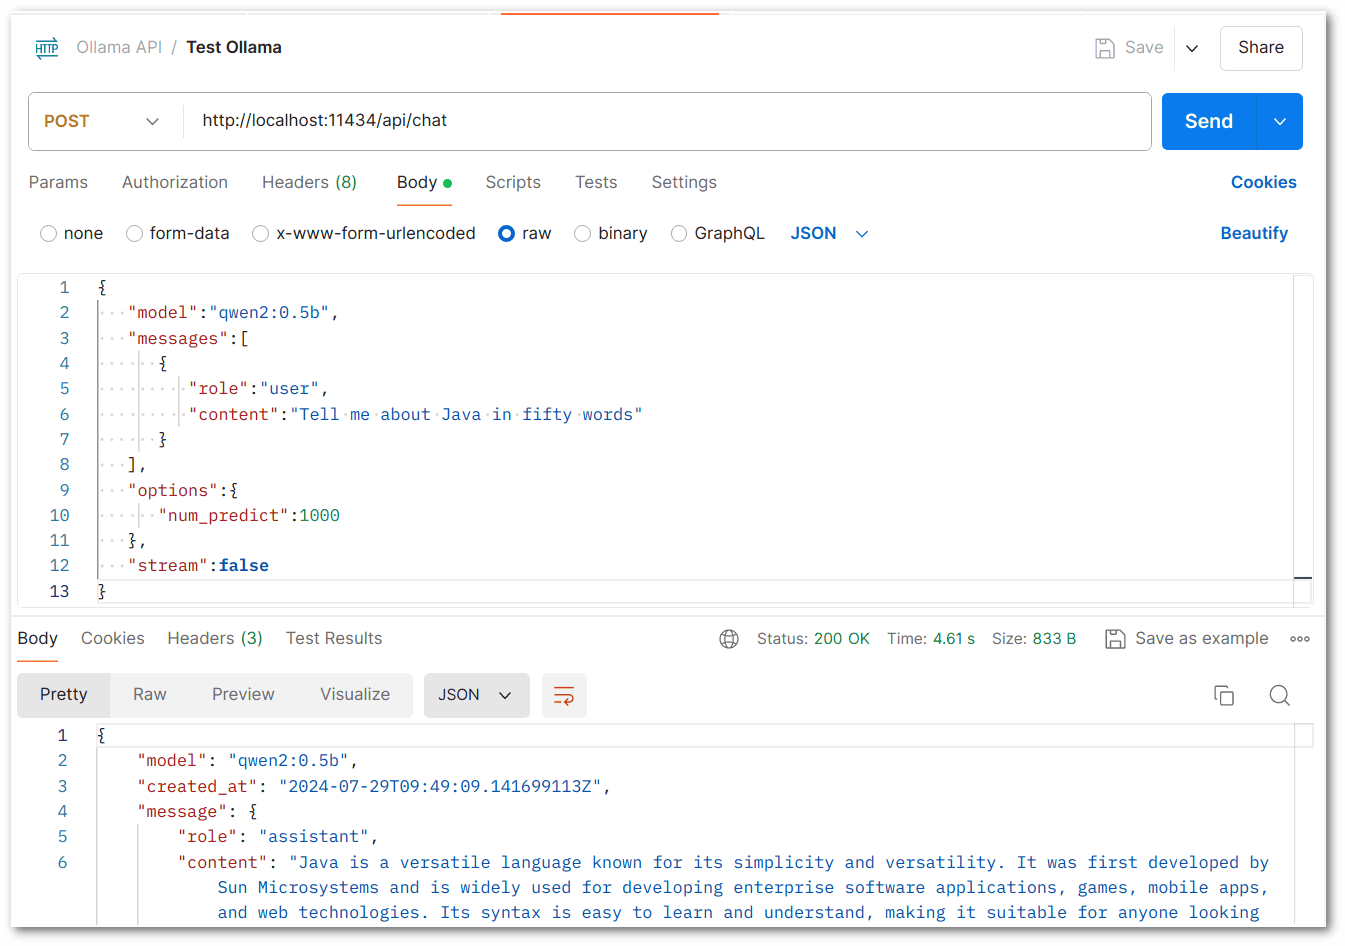
✅ 收到有效 JSON 响应后即可集成 LangChain4j。
⚠️ 注意参数大小写!例如
"role": "user"正确,而"role": "USER"会报错。
3.1. 配置 LangChain4j
在 pom.xml 添加依赖(最新版本):
<dependency>
    <groupId>dev.langchain4j</groupId>
    <artifactId>langchain4j-core</artifactId>
    <version>0.33.0</version>
</dependency>
<dependency>
    <groupId>dev.langchain4j</groupId>
    <artifactId>langchain4j-ollama</artifactId>
    <version>0.33.0</version>
</dependency>
在 application.properties 添加配置:
# Ollama API 配置
ollama.api_url=http://localhost:11434/
ollama.model=qwen2:1.5b
ollama.timeout=30
ollama.max_response_length=1000
💡
ollama.timeout和ollama.max_response_length为可选参数,用于防止某些模型因 bug 导致响应死循环。
3.2. 实现 ChatbotService
使用 @Value 注入配置值,实现逻辑与配置解耦:
@Value("${ollama.api_url}")
private String apiUrl;

@Value("${ollama.model}")
private String modelName;

@Value("${ollama.timeout}")
private int timeout;

@Value("${ollama.max_response_length}")
private int maxResponseLength;
在 @PostConstruct 方法中初始化 OllamaChatModel(封装与 AI 模型交互的配置):
private OllamaChatModel ollamaChatModel;

@PostConstruct
public void init() {
    this.ollamaChatModel = OllamaChatModel.builder()
      .baseUrl(apiUrl)
      .modelName(modelName)
      .timeout(Duration.ofSeconds(timeout))
      .numPredict(maxResponseLength)
      .build();
}
核心方法 getResponse() 处理问答流程:
public String getResponse(String question) {
    logger.debug("发送至 Ollama: {}",  question);
    String answer = ollamaChatModel.generate(question);
    logger.debug("接收自 Ollama: {}",  answer);
    if (answer != null && !answer.isEmpty()) {
        return answer;
    } else {
        logger.error("Ollama 响应无效,问题:\n\n" + question);
        throw new ResponseStatusException(
          HttpStatus.SC_INTERNAL_SERVER_ERROR,
          "Ollama 未生成有效响应",
          null);
    }
}
3.3. 创建 ChatbotController
开发阶段用于测试 ChatbotService 的控制器:
@Autowired
private ChatbotService chatbotService;

@GetMapping("/api/chatbot/send")
public String getChatbotResponse(@RequestParam String question) {
    return chatbotService.getResponse(question);
}
测试效果:
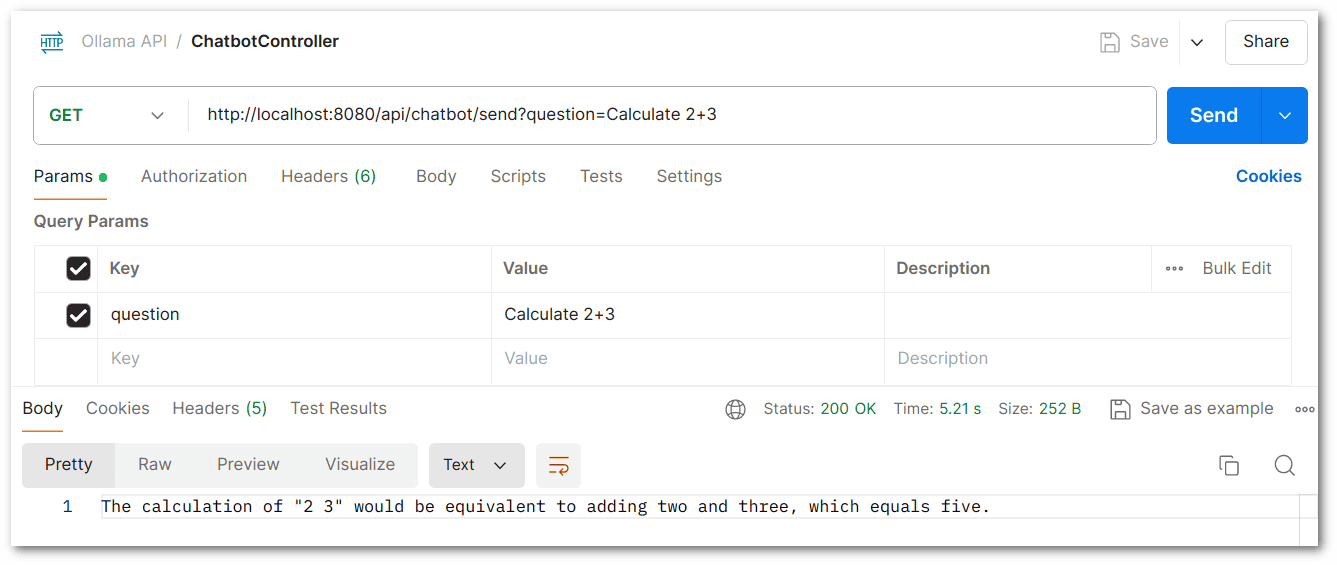
✅ 符合预期。
4. Apache Camel 集成 WhatsApp
首先在 Meta for Developers 创建账号(测试阶段 WhatsApp API 免费)。
4.1. ngrok 反向代理
需使用跨平台反向代理工具 ngrok 创建 HTTPS 公网隧道,将本地 Spring Boot 服务暴露给 WhatsApp。命令如下(替换 xxx.ngrok-free.app 为你的静态域名):
ngrok http --domain=xxx.ngrok-free.app 8080
此命令将 https://xxx.ngrok-free.app 转发到 http://localhost:8080。
4.2. 配置 Apache Camel
添加三个关键依赖(最新版本):
<dependency>
    <groupId>org.apache.camel.springboot</groupId>
    <artifactId>camel-spring-boot-starter</artifactId>
    <version>4.7.0</version>
</dependency>
<dependency>
    <groupId>org.apache.camel.springboot</groupId>
    <artifactId>camel-http-starter</artifactId>
    <version>4.7.0</version>
</dependency>
<dependency>
    <groupId>org.apache.camel</groupId>
    <artifactId>camel-jackson</artifactId>
    <version>4.7.0</version>
</dependency>
📌 依赖说明:
camel-spring-boot-starter:集成 Camel 到 Spring Bootcamel-http-starter:支持 HTTP/HTTPS 路由camel-jackson:JSON 序列化/反序列化
在 application.properties 添加配置:
# WhatsApp API 配置
whatsapp.verify_token=BaeldungDemo-Verify-Token
whatsapp.api_url=https://graph.facebook.com/v20.0/PHONE_NUMBER_ID/messages
whatsapp.access_token=ACCESS_TOKEN
⚠️
PHONE_NUMBER_ID和ACCESS_TOKEN需从 WhatsApp Business 获取(后续步骤说明)。
4.3. Webhook 验证控制器
需创建控制器验证 WhatsApp webhook 令牌,确保接口安全:
@Value("${whatsapp.verify_token}")
private String verifyToken;

@GetMapping("/webhook")
public String verifyWebhook(@RequestParam("hub.mode") String mode,
  @RequestParam("hub.verify_token") String token,
  @RequestParam("hub.challenge") String challenge) {
    if ("subscribe".equals(mode) && verifyToken.equals(token)) {
        return challenge;
    } else {
        return "Verification failed";
    }
}
当前进展:
- ✅ ngrok 已暴露本地服务
- ✅ Camel 依赖已添加
- ✅ Webhook 验证控制器就绪
- ❌ 尚未获取
PHONE_NUMBER_ID和ACCESS_TOKEN
4.4. WhatsApp Business 账号配置
官方入门指南 较复杂,以下步骤专为 Spring Boot 集成优化:
- 创建名为 "Baeldung Chatbot" 的商业组合
- 创建商业应用
- 复制 WhatsApp 手机号 ID 到
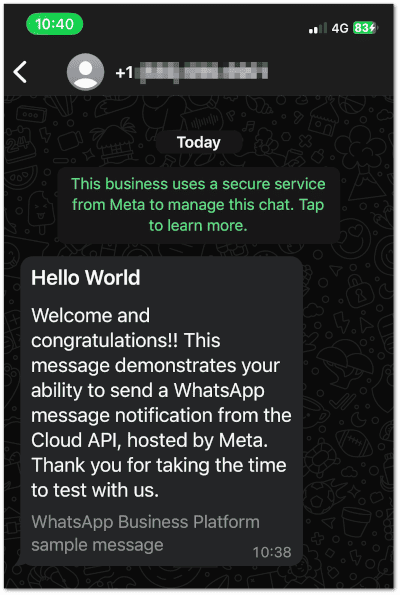
whatsapp.api_url - 发送测试消息到个人手机(集合此页面,开发中可能需要)
此时应收到测试消息:
获取 whatsapp.access_token:
- 访问 系统用户
- 生成永不过期的令牌(需管理员权限)
🚀 启动 Spring Boot 应用后再配置 webhook!
在 WhatsApp 后台配置:
- Callback URL:
https://xxx.ngrok-free.app/webhook - Verify Token:
BaeldungDemo-Verify-Token
⚠️ 严格按顺序操作,避免踩坑!
4.5. 配置 WhatsAppService 发送消息
先用 Postman 测试消息发送,观察 JSON 结构和请求头:
请求头(Authorization 格式:Bearer + ACCESS_TOKEN):

请求体:
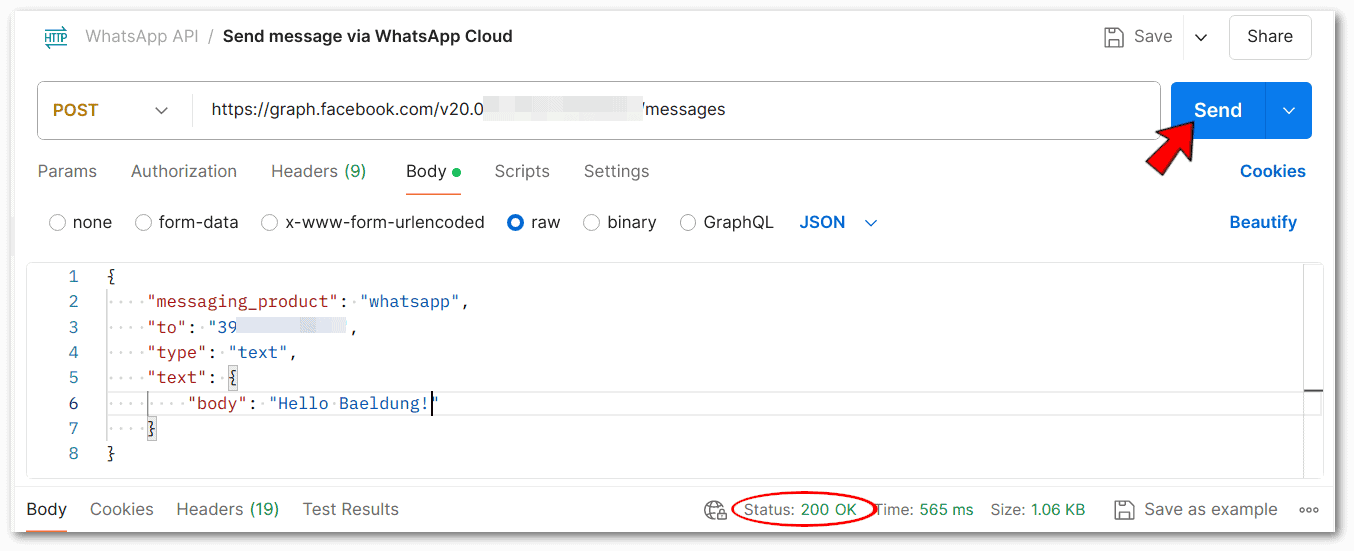
⚠️ HTTP 200 仅表示请求成功,消息实际发送需满足条件:用户需先从手机向商业号发送消息(机器人不能主动发起对话)。
注入配置值:
@Value("${whatsapp.api_url}")
private String apiUrl;

@Value("${whatsapp.access_token}")
private String apiToken;
init() 方法配置 Camel 路由(复制 Postman 的请求头):
@Autowired
private CamelContext camelContext;

@PostConstruct
public void init() throws Exception {
    camelContext.addRoutes(new RouteBuilder() {
        @Override
        public void configure() {
            JacksonDataFormat jacksonDataFormat = new JacksonDataFormat();
            jacksonDataFormat.setPrettyPrint(true);

            from("direct:sendWhatsAppMessage")
              .setHeader("Authorization", constant("Bearer " + apiToken))
              .setHeader("Content-Type", constant("application/json"))
              .marshal(jacksonDataFormat)
              .process(exchange -> {
                  logger.debug("发送 JSON: {}", exchange.getIn().getBody(String.class));
              }).to(apiUrl).process(exchange -> {
                  logger.debug("响应: {}", exchange.getIn().getBody(String.class));
              });
        }
    });
}
sendWhatsAppMessage() 方法通过 Camel 的 ProducerTemplate 发送消息:
@Autowired
private ProducerTemplate producerTemplate;

public void sendWhatsAppMessage(String toNumber, String message) {
    Map<String, Object> body = new HashMap<>();
    body.put("messaging_product", "whatsapp");
    body.put("to", toNumber);
    body.put("type", "text");

    Map<String, String> text = new HashMap<>();
    text.put("body", message);
    body.put("text", text);

    producerTemplate.sendBody("direct:sendWhatsAppMessage", body);
}
4.6. 配置 WhatsAppService 接收消息
processIncomingMessage() 处理 webhook 消息,调用 AI 服务并回复:
@Autowired
private ObjectMapper objectMapper;

@Autowired
private ChatbotService chatbotService;

public void processIncomingMessage(String payload) {
    try {
        JsonNode jsonNode = objectMapper.readTree(payload);
        JsonNode messages = jsonNode.at("/entry/0/changes/0/value/messages");
        if (messages.isArray() && messages.size() > 0) {
            String receivedText = messages.get(0).at("/text/body").asText();
            String fromNumber = messages.get(0).at("/from").asText();
            logger.debug(fromNumber + " 发送消息: " + receivedText);
            this.sendWhatsAppMessage(fromNumber, chatbotService.getResponse(receivedText));
        }
    } catch (Exception e) {
        logger.error("处理消息失败: {} ", payload, e);
    }
}
4.7. 创建 WhatsAppController
发送消息测试接口:
@Autowired
private WhatsAppService whatsAppService;

@PostMapping("/api/whatsapp/send")
public String sendWhatsAppMessage(@RequestParam String to, @RequestParam String message) {
    whatsAppService.sendWhatsAppMessage(to, message);
    return "Message sent";
}
测试效果:

接收消息的 webhook 接口:
@PostMapping("/webhook")
public void receiveMessage(@RequestBody String payload) {
    whatsAppService.processIncomingMessage(payload);
}
最终测试效果:
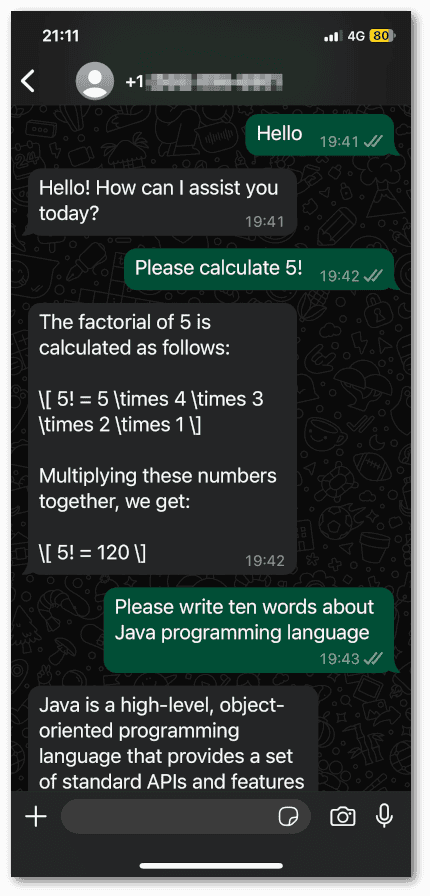
✅ Ollama 使用 LaTeX 语法回答数学问题。
qwen2:1.5b模型支持 29 种语言,完整列表。
5. 总结
本文演示了如何通过 Apache Camel 和 LangChain4j 在 Spring Boot 中构建 WhatsApp 对话式 AI,核心步骤包括:
- Ollama 本地部署:配置 AI 模型服务
- LangChain4j 集成:通过
ChatbotService处理 AI 交互 - WhatsApp 集成:
- 使用 ngrok 暴露本地服务
- 配置 Apache Camel 处理消息路由
- 通过
WhatsAppService实现消息收发
- 全流程测试:通过专用控制器验证功能
📦 完整源码见 GitHub 仓库。