1. 引言
本文将深入讲解 Java 中的事务机制,涵盖本地事务(resource local transaction)与全局事务(global transaction)的实现方式。同时,我们会探讨在纯 Java 和 Spring 框架中如何高效管理事务,帮助你在实际项目中避免踩坑。
对于有经验的开发者来说,事务不是陌生概念,但跨资源事务的复杂性和性能影响往往被低估。本文将从底层机制到高层抽象,带你系统掌握 Java 事务的核心要点。
2. 什么是事务?
事务本质上是一组必须全部成功,否则全部回滚的操作集合。✅
如果其中任何一个操作失败,整个操作序列必须回退(rollback),确保应用状态不被破坏。
⚠️ 事务的核心目标:保证数据一致性(ACID)
在 Java 中,事务可能涉及多种资源:
- 数据库(如 MySQL)
- 消息队列(如 ActiveMQ)
- 分布式缓存等
当事务只涉及单一资源时,称为 本地事务;
当事务跨越多个资源(如数据库 + 消息队列),则称为 全局事务 或 分布式事务。
3. 本地事务
本地事务指在单个资源内部执行的一组操作,作为一个不可分割的单元。
常见的资源包括数据库、消息队列等。下面分别介绍 JDBC、JPA、JMS 中的本地事务使用方式。
3.1. JDBC 事务
JDBC 是 Java 访问数据库的标准 API。每个 Connection 默认处于 auto-commit 模式,即每条 SQL 语句自动提交。
要实现多条 SQL 作为一个事务执行,必须手动关闭 auto-commit,并显式控制提交或回滚:
Connection connection = DriverManager.getConnection(CONNECTION_URL, "user", "password");
try {
    connection.setAutoCommit(false); // 关闭自动提交
    PreparedStatement firstStatement = connection.prepareStatement("INSERT INTO users (name) VALUES ('Alice')");
    firstStatement.executeUpdate();
    PreparedStatement secondStatement = connection.prepareStatement("INSERT INTO logs (action) VALUES ('user_created')");
    secondStatement.executeUpdate();
    connection.commit(); // 手动提交
} catch (Exception e) {
    connection.rollback(); // 出错回滚
} finally {
    connection.close();
}
✅ 要点总结:
- 使用
setAutoCommit(false)开启事务 - 用
commit()提交,rollback()回滚 - 可通过
Savepoint实现部分回滚
3.2. JPA 事务
JPA 是 Java 中用于对象关系映射(ORM)的规范,常见实现有 Hibernate、EclipseLink 等。
JPA 通过 EntityManager 管理实体对象,其操作在 持久化上下文(persistence context) 中进行。默认情况下,该上下文是事务范围的(transaction-scoped)。
手动管理 JPA 事务示例:
EntityManagerFactory emf = Persistence.createEntityManagerFactory("jpa-example");
EntityManager em = emf.createEntityManager();
try {
    em.getTransaction().begin();
    em.persist(new User("Bob"));
    em.persist(new Log("user_created"));
    em.getTransaction().commit();
} catch (Exception e) {
    em.getTransaction().rollback();
} finally {
    em.close();
    emf.close();
}
⚠️ 注意:
EntityManager需配合Transaction使用- 在 Spring 中通常由容器自动管理,无需手动调用
3.3. JMS 事务
JMS 是 Java 的消息服务规范,支持 ActiveMQ、IBM MQ 等消息中间件。
JMS 支持事务性会话(transacted session),允许将多个消息发送操作打包为一个事务。
ActiveMQConnectionFactory connectionFactory = new ActiveMQConnectionFactory("tcp://localhost:61616");
Connection connection = connectionFactory.createConnection();
connection.start();
try {
    Session session = connection.createSession(true, 0); // 第一个参数 true 表示事务会话
    Destination destination = session.createTopic("ORDER_EVENTS");
    MessageProducer producer = session.createProducer(destination);
    producer.send(session.createTextMessage("OrderCreated"));
    producer.send(session.createTextMessage("PaymentProcessed"));
    session.commit(); // 提交事务
} catch (Exception e) {
    session.rollback(); // 回滚
} finally {
    connection.close();
}
✅ 关键点:
- 创建
Session时传入true启用事务 - 生产和消费不能在同一个事务中(消息中间件限制)
- 事务范围:客户端 ↔ 消息服务器

4. 全局事务(分布式事务)
当业务逻辑涉及多个资源(如数据库 + 消息队列),本地事务无法保证整体一致性。此时需要 全局事务 来协调多个资源。
典型的场景:
- 向数据库插入订单
- 向消息队列发送“订单创建”事件
这两个操作必须同时成功或同时失败,否则数据将不一致。
4.1. JTA(Java Transaction API)
JTA 是 Java EE 提供的分布式事务标准 API,基于 XA 协议实现,支持两阶段提交(2PC)。
核心接口:
TransactionManager:由应用服务器使用,控制事务生命周期UserTransaction:供应用代码显式控制事务边界XAResource:资源管理器(如数据库、MQ)与事务管理器的桥梁
JTA 抽象了底层资源的差异,让多个 XA 兼容资源能参与同一个全局事务。
4.2. JTS(Java Transaction Service)
JTS 是 JTA 的底层实现规范,基于 CORBA OTS 标准,负责在分布式环境中传播事务上下文。
⚠️ 实际开发中,JTS 通常由应用服务器(如 WebLogic、WebSphere)内置提供,开发者无需直接操作。
5. JTA 事务管理
5.1. 应用服务器中的 JTA
在传统 Java EE 应用服务器中,JTA 依赖容器提供事务管理服务。
两种事务管理方式:
- ✅ 容器管理事务(CMT):由 EJB 容器自动控制事务边界,代码简洁但灵活性差
- ✅ Bean 管理事务(BMT):开发者通过
UserTransaction手动控制,灵活但复杂
⚠️ 缺点:
- 应用强依赖应用服务器
- 难以测试、部署和迁移
- 不适合微服务架构
5.2. 独立部署的 JTA(Standalone JTA)
为解耦应用服务器,可使用独立事务管理器,如 Atomikos 或 Bitronix。
以下示例使用 Atomikos 实现数据库 + 消息队列的分布式事务:
配置 XA 数据源
AtomikosDataSourceBean atomikosDataSourceBean = new AtomikosDataSourceBean();
atomikosDataSourceBean.setXaDataSourceClassName("com.mysql.cj.jdbc.MysqlXADataSource");
atomikosDataSourceBean.setUniqueResourceName("xads");
// 设置数据库连接信息
MysqlXADataSource mysqlXaDataSource = new MysqlXADataSource();
mysqlXaDataSource.setUrl("jdbc:mysql://127.0.0.1:3306/test");
mysqlXaDataSource.setUser("user");
mysqlXaDataSource.setPassword("password");
atomikosDataSourceBean.setXaDataSource(mysqlXaDataSource);
DataSource dataSource = atomikosDataSourceBean;
配置 XA 消息连接工厂
AtomikosConnectionFactoryBean atomikosConnectionFactoryBean = new AtomikosConnectionFactoryBean();
atomikosConnectionFactoryBean.setXaConnectionFactory(new ActiveMQXAConnectionFactory("tcp://localhost:61616"));
atomikosConnectionFactoryBean.setUniqueResourceName("xamq");
ConnectionFactory connectionFactory = atomikosConnectionFactoryBean;
使用 UserTransaction 控制事务
UserTransaction userTransaction = new UserTransactionImp();
userTransaction.setTransactionTimeout(300);

try {
    userTransaction.begin();

    // 1. 数据库操作
    java.sql.Connection dbConn = dataSource.getConnection();
    PreparedStatement ps = dbConn.prepareStatement("INSERT INTO orders (item) VALUES (?)");
    ps.setString(1, "laptop");
    ps.executeUpdate();

    // 2. 消息发送
    javax.jms.Connection mqConn = connectionFactory.createConnection();
    Session session = mqConn.createSession(false, Session.AUTO_ACKNOWLEDGE);
    MessageProducer producer = session.createProducer(session.createQueue("ORDER_QUEUE"));
    producer.send(session.createTextMessage("New order: laptop"));

    userTransaction.commit(); // 两阶段提交
} catch (Exception e) {
    userTransaction.rollback(); // 全部回滚
}
✅ Atomikos 的优势:
- 无需应用服务器
- 自动注册 XA 资源
- 易于集成到 Spring
6. Spring 中的事务支持
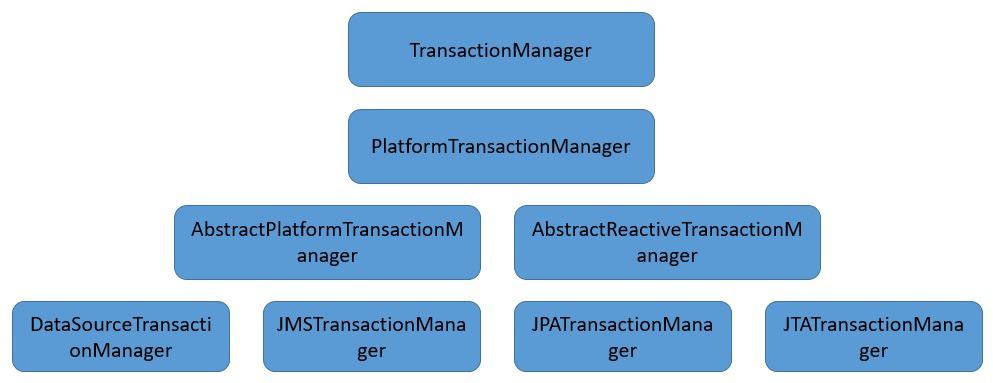
Spring 提供了统一的事务抽象层,屏蔽了 JDBC、JPA、JMS、JTA 等不同资源的差异,极大简化了事务管理。
其核心机制是 AOP 代理 + TransactionManager:
6.1. Spring 配置示例(集成 Atomikos)
配置 JTA 事务管理器
@Bean
public PlatformTransactionManager platformTransactionManager() throws Throwable {
    JtaTransactionManager jtaTransactionManager = new JtaTransactionManager();
    jtaTransactionManager.setTransactionManager(transactionManager());
    jtaTransactionManager.setUserTransaction(userTransaction());
    return jtaTransactionManager;
}

@Bean
public UserTransaction userTransaction() {
    UserTransactionImp ut = new UserTransactionImp();
    ut.setTransactionTimeout(300);
    return ut;
}

@Bean(initMethod = "init", destroyMethod = "close")
public TransactionManager transactionManager() {
    UserTransactionManager utm = new UserTransactionManager();
    utm.setForceShutdown(false);
    return utm;
}
配置 JMS 和 JPA
@Bean
public JmsTemplate jmsTemplate() throws Throwable {
    return new JmsTemplate(connectionFactory());
}

@Bean
public ConnectionFactory connectionFactory() {
    ActiveMQXAConnectionFactory xaConnectionFactory = new ActiveMQXAConnectionFactory("tcp://localhost:61616");
    AtomikosConnectionFactoryBean cfBean = new AtomikosConnectionFactoryBean();
    cfBean.setXaConnectionFactory(xaConnectionFactory);
    cfBean.setUniqueResourceName("xamq");
    cfBean.setLocalTransactionMode(false);
    return cfBean;
}

@Bean
public LocalContainerEntityManagerFactoryBean entityManagerFactory() throws SQLException {
    LocalContainerEntityManagerFactoryBean em = new LocalContainerEntityManagerFactoryBean();
    em.setDataSource(dataSource());
    em.setJpaVendorAdapter(new HibernateJpaVendorAdapter());
    Properties jpaProperties = new Properties();
    jpaProperties.setProperty("javax.persistence.transactionType", "JTA");
    em.setJpaProperties(jpaProperties);
    return em;
}

@Bean(initMethod = "init", destroyMethod = "close")
public DataSource dataSource() throws SQLException {
    MysqlXADataSource mysqlXaDataSource = new MysqlXADataSource();
    mysqlXaDataSource.setUrl("jdbc:mysql://127.0.0.1:3306/test");
    mysqlXaDataSource.setUser("user");
    mysqlXaDataSource.setPassword("password");
    AtomikosDataSourceBean dsBean = new AtomikosDataSourceBean();
    dsBean.setXaDataSource(mysqlXaDataSource);
    dsBean.setUniqueResourceName("xads");
    return dsBean;
}
6.2. 事务管理方式
✅ 声明式事务(推荐)
使用 @Transactional 注解,简单粗暴:
@PersistenceContext
private EntityManager entityManager;

@Autowired
private JmsTemplate jmsTemplate;

@Transactional(propagation = Propagation.REQUIRED)
public void processOrder(Order order) {
    entityManager.persist(order);
    jmsTemplate.convertAndSend("ORDER_QUEUE", order);
}
Spring 会在方法执行前后自动开启/提交事务,异常时回滚。
✅ 编程式事务(精细控制)
适用于复杂逻辑,需手动控制事务边界:
@Autowired
private PlatformTransactionManager transactionManager;

public void processOrder(Order order) {
    TransactionTemplate txTemplate = new TransactionTemplate(transactionManager);
    txTemplate.executeWithoutResult(status -> {
        entityManager.persist(order);
        jmsTemplate.convertAndSend("ORDER_QUEUE", order);
    });
}
7. 总结与最佳实践
分布式事务虽然强大,但代价高昂。以下是关键建议:
✅ 优先使用独立事务管理器(如 Atomikos)
避免绑定应用服务器,提升可移植性,更适合微服务。
✅ 善用 Spring 的事务抽象
屏蔽底层差异,业务代码无需关心 JDBC、JPA 或 JTA 细节。
✅ 谨慎设计事务边界
事务是阻塞的,影响性能。应尽量缩短事务范围,避免长事务。
✅ 能不用分布式事务就不用
考虑使用 最终一致性 + 补偿机制(Saga 模式) 替代强一致性事务,提升系统吞吐量。
❌ 踩坑提醒:不要在
@Transactional方法中调用本类的其他方法,会导致 AOP 代理失效!
8. 结论
本文系统讲解了 Java 中的事务机制:
- 本地事务(JDBC、JPA、JMS)
- 全局事务(JTA/XA)
- 独立事务管理(Atomikos)
- Spring 的声明式与编程式事务
Spring + Atomikos 的组合,既保留了分布式事务的一致性保障,又解耦了应用服务器依赖,是现代 Java 应用的推荐方案。
但请记住:事务不是银弹,能不用就不用,能小就不要大。